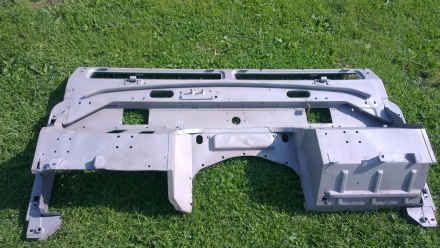
Painting the new chassis

By Rebuild Defender 90, Uncategorized
IMAG1365

Chassis painted

IMAG1366

Underside still needs to be done

IMAG1367

Front underside of the chassis

After our vacation I started painting the new chassis. It took way longer than I expected it to take. With only one person and a small brush it took about 3 hours+ to paint it once, second coat was a bit faster, about 2 hours. But since we couldn’t put the chassis at such a height that it could be painted at once, I had to do the bottom part later. Took also about 1,5 hours, so now I’m done painting it.

So that’s finished, just the rear cross member will be sprayed in the final car color later on. Also painted some other minor stuff, just to work ahead.

IMAG1368

Crossmember got some paining as well
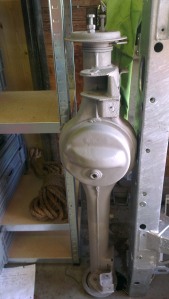


DSCN4346

Test Fitting

We also started preparing the axles so we can have a rolling chassis. Almost finished both sides of the hubs, swivel pin housings and disc brakes. Almost all parts are new or have been sand blasted. Also brought both differentials to Barten4x4 in Veghel. He did an excellent job refurbishing the old 10 splines diffs, so they can take a couple of miles again. Next couple of weeks will be rebuilding the axles so they are fully ready again, fit some springs (just for the meantime) and get our self a rolling chassis.

DSCN4345

test fitting

Painting

By Rebuild Defender 90, Uncategorized

Since the axles were already blasted, the first thing we did was weld them and give them a new impact resistant coating.

We already used the coating on the defender 110 we own. After 5 months its still shining under the defender with no chips after driving offroad. DSCN4047

DSCN4046

DSCN4045

The paint we used

The paint we used

Sandblasting

By Rebuild Defender 90, Uncategorized

Since we don’t want to go to the sandblaster with all the rusty parts, we have we bought a sandblasting cabinet. It works really well and I can recommend it. Especially with a or several Land Rovers.

A cabinet is easy to build yourself. Ours is bought though. The principle is easy. The blasting gun sucks up the grid with the airflow. After the blasting the grit goes back to the bottom of the cabinet where the cycle starts over. The downside of this set up is that you need a large air compressor and a part of the pressure is used to suck up the grid. So when you set the compressor at 7 bar, you won’t be blasting at 7 bar.

There is another way of blasting. It’s with a pressure pot. With this set up you have an air tank half filled with grid and pressurized. Because of the pressure, the grid is pushed out instead of sucked up. Another hose gets pressured air to the part where the grid exits the tank. This way you lose no pressure and you can blast at just 4 or 5bar instead of 8 bar with the suck up system. There for its way more effective and it blasts way faster than with the old setup. With the pressure pot we can blast 6 times faster than with the suck up system.  I can do a brake caliper in about 6 minutes.

The downside is that the pressure pot is made in china and it has some design flaws. The valve that regulates the grit flow tends to get blocked by sand that is sticking together because of water that is pumped in when it’s really humid outside. Or just by rust or paint parts.

Therefor we are going to modify the valve and make it larger.

A - 1/2" MIP x 3/8" MIP B - 1/2" ball valve C - 1/2" x close nipple D - 1/2" MIP x 1/2" barbed fitting E - 1/2" galvanized Tee F - 1/2" galvanized 45* G - 1/2" MIP x 3/8" MIP H - 3/8" brass coupling

A – 1/2″ MIP x 3/8″ MIP
B – 1/2″ ball valve
C – 1/2″ x close nipple
D – 1/2″ MIP x 1/2″ barbed fitting
E – 1/2″ galvanized Tee
F – 1/2″ galvanized 45*
G – 1/2″ MIP x 3/8″ MIP
H – 3/8″ brass coupling

Boven nieuwe doorvoer Onder oude doorvoer

Boven nieuwe doorvoer
Onder oude doorvoer

Welding, cleaning, sandblasting, painting

By Rebuild Defender 90, Uncategorized


DSCN4079

Me with one of the parts before sandblasting

DSCN4052

The axles hanging in the garage.

The past week we have been busy with welding, taking the axles apart, cleaning, some sandblasting and painting.

First started on the axles. It needed some new mounts and brackets, so old ones off and welded the new ones on. Then painted it black to prevent rust from forming. Once we have the diffs refurbished, the final layers of painting will be put on.

DSCN4043

Welding the bulkhead

Next up was the bulkhead. It needed new footwells and after the sand blasting it showed some more bad spots. Cutting out the footwells was quite easy, welding the new parts back in not so. The parts we got from Paddock weren’t fitting properly, to less or to much material, wrong shapes. So it needed a lot of adjusting. Now waiting for another new part, the bulkhead top corner piece. It looked like it just needed a small new plate, but the welding “ate” away more and more material so we decided to replace the whole part. We also need to chance the top part of the bulkhead where the window sits on.

DSCN4074

All the parts taken apart.

DSCN4077

Brake calipers, after and before sandblasting.

Since the bulkhead project was on hold, we continued with the axle hubs and brake calipers. Cleaned them and now we are sand blasting them.

We also took part of the engine apart. Most of the parts looked fine, however we found a small part in the oil. In the coming days we will start to investigate what it is. Hopefully it isn’t anything major as we didn’t planned to do a complete overhaul.

DSCN4085

Our dog Sky watching over the engine

Don’t forget to view the link to the photos, there are more off the project there.

And the parts have returned

By Rebuild Defender 90, Uncategorized
Bulkhead

All paint is gone

Front Axle

Also this one has cleaned up pretty

Today we picked up the parts at our sandblaster. Hans from Habraken Straalbedrijf in Best did a great job. The paint on the bulkhead was first thermally removed. Then everything was sandblasted. Because the rust and paint is now gone you can really see the weak spots. There are a couple, but it isn’t bad. This week we will start most of the welding on the axles, bulkheads and inner wings.

Rear Axle

And the rear axle as well

Inner wings

Inner wings are looking good

Some more photos can be seen in the link on the previous post. 

Off to the sandblaster

By Rebuild Defender 90, Uncategorized

Yesterday we brought the 2 axles, the inner wings and the bulkhead to the sandblaster. At the end of the week we can probably pick it up. After that we can fix and weld some bad spots and brackets on the axles. Weld in some new foot wells on the bulkhead. Then we will have it all galvanized except for the axles.

Today I also bought some new parts for the axles, new brake discs, pads and seals. That way we can really finish the axles, paint them and get them under the chassis so we have a rolling one.

Also I have decided to make a separate album for all the photo’s since this space it not big enough to show all the photo’s. You can have a look at: Photo Album

Parts at the sandblaster

Parts at the sandblaster

Received the Marsland chassis

By Rebuild Defender 90, Uncategorized
IMAG1100

New Marsland chassis

Last week I have received the all new Marsland Chassis. It looks absolutely amazing! All shiny, no dents, scratches or rust anywhere! Soon we can start rebuilding the car. It will be given a nice black colour and then we can start making it a “rolling” chassis. The axles are going to be sandblasted and also painted black, welding some new parts on since some parts are rusted away. Refurbishing the front brakes and put new disk brakes on the back. Then some temporary wheels on and fitting the springs between the chassis and axle and it will roll!

IMAG1102

No doubt about it, it’s from Marsland.

IMAG1103

Back side

IMAG1106

Front axle with some repair work.

IMAG1107

The previous chassis with engine.

Ordered the new chassis

By Rebuild Defender 90, Uncategorized

As said before we had to buy a new chassis. Last week we ordered the new Marsland chassis from a local workshop Sons4x4 in Sint-Oedenrode, Netherlands. He is going to pick it up in the second week of June, so we should have it by the third. Then we can really begin the process of rebuilding the car. One of the first things will be to paint the chassis. The galvanized chassis wont stay shiny for very long once in use and to protect it even more we will either put black component spray or bedliner on it.

In the next few weeks we are quite busy, so next update will be in June.

Image of the new chassis

Taking the 90 down

By Rebuild Defender 90, Uncategorized

In the past few months we have slowly taken everything of the 90. The previous owner stated that the chassis was alright with some minor welding spots. However, having stripped everything of and seeing the bare chassis we knew that it would require a new one. Yesterday the 21st of May 2014 the RDW (the Dutch road authority) came to the 90 to see the car and tag it so we can buy a new chassis. And once the car is rebuild we can go to them and have the chassis number engraved again.

Defender 90 project (147) Defender 90 project (287) Defender 90 project (304) Defender 90 project (346)

Land Rover Defender 90 project

By Rebuild Defender 90, Uncategorized

My boyfriend already owns 2 Land Rovers and slowly it grew on my to buy my own and then totally restore it for expedition use. In December 2013 I bought my first Land Rover Defender 90. From the start it was clear we wanted to rebuild the whole car from scratch, reusing parts that where still ok, buying or upgrading the rest. Since I also learned a lot from other people’s blogs and through forums, I wanted to do the same and maybe help someone with their project. It is also nice to see a written result for my self and remembering how it all came along.
The main photo is my car in the old condition. The grill and hood have already been sold. However I forgot to make better photo’s in the beginning.
I will post regular updates on the status of the rebuild project. Hopefully you enjoy it and find it useful.

Afbeelding