All Posts By

admin

Painting

By Rebuild Defender 90, Uncategorized

Since the axles were already blasted, the first thing we did was weld them and give them a new impact resistant coating.

We already used the coating on the defender 110 we own. After 5 months its still shining under the defender with no chips after driving offroad. DSCN4047

DSCN4046

DSCN4045

The paint we used

The paint we used

Sandblasting

By Geen onderdeel van een categorie, Rebuild Defender 90 @nl

Since we don’t want to go to the sandblaster with all the rusty parts, we have we bought a sandblasting cabinet. It works really well and I can recommend it. Especially with a or several Land Rovers.

A cabinet is easy to build yourself. Ours is bought though. The principle is easy. The blasting gun sucks up the grid with the airflow. After the blasting the grit goes back to the bottom of the cabinet where the cycle starts over. The downside of this set up is that you need a large air compressor and a part of the pressure is used to suck up the grid. So when you set the compressor at 7 bar, you won’t be blasting at 7 bar.

There is another way of blasting. It’s with a pressure pot. With this set up you have an air tank half filled with grid and pressurized. Because of the pressure, the grid is pushed out instead of sucked up. Another hose gets pressured air to the part where the grid exits the tank. This way you lose no pressure and you can blast at just 4 or 5bar instead of 8 bar with the suck up system. There for its way more effective and it blasts way faster than with the old setup. With the pressure pot we can blast 6 times faster than with the suck up system.  I can do a brake caliper in about 6 minutes.

The downside is that the pressure pot is made in china and it has some design flaws. The valve that regulates the grit flow tends to get blocked by sand that is sticking together because of water that is pumped in when it’s really humid outside. Or just by rust or paint parts.

Therefor we are going to modify the valve and make it larger.

A - 1/2" MIP x 3/8" MIP B - 1/2" ball valve C - 1/2" x close nipple D - 1/2" MIP x 1/2" barbed fitting E - 1/2" galvanized Tee F - 1/2" galvanized 45* G - 1/2" MIP x 3/8" MIP H - 3/8" brass coupling

A – 1/2″ MIP x 3/8″ MIP
B – 1/2″ ball valve
C – 1/2″ x close nipple
D – 1/2″ MIP x 1/2″ barbed fitting
E – 1/2″ galvanized Tee
F – 1/2″ galvanized 45*
G – 1/2″ MIP x 3/8″ MIP
H – 3/8″ brass coupling

Boven nieuwe doorvoer Onder oude doorvoer

Boven nieuwe doorvoer
Onder oude doorvoer

Sandblasting

By Rebuild Defender 90, Uncategorized

Since we don’t want to go to the sandblaster with all the rusty parts, we have we bought a sandblasting cabinet. It works really well and I can recommend it. Especially with a or several Land Rovers.

A cabinet is easy to build yourself. Ours is bought though. The principle is easy. The blasting gun sucks up the grid with the airflow. After the blasting the grit goes back to the bottom of the cabinet where the cycle starts over. The downside of this set up is that you need a large air compressor and a part of the pressure is used to suck up the grid. So when you set the compressor at 7 bar, you won’t be blasting at 7 bar.

There is another way of blasting. It’s with a pressure pot. With this set up you have an air tank half filled with grid and pressurized. Because of the pressure, the grid is pushed out instead of sucked up. Another hose gets pressured air to the part where the grid exits the tank. This way you lose no pressure and you can blast at just 4 or 5bar instead of 8 bar with the suck up system. There for its way more effective and it blasts way faster than with the old setup. With the pressure pot we can blast 6 times faster than with the suck up system.  I can do a brake caliper in about 6 minutes.

The downside is that the pressure pot is made in china and it has some design flaws. The valve that regulates the grit flow tends to get blocked by sand that is sticking together because of water that is pumped in when it’s really humid outside. Or just by rust or paint parts.

Therefor we are going to modify the valve and make it larger.

A - 1/2" MIP x 3/8" MIP B - 1/2" ball valve C - 1/2" x close nipple D - 1/2" MIP x 1/2" barbed fitting E - 1/2" galvanized Tee F - 1/2" galvanized 45* G - 1/2" MIP x 3/8" MIP H - 3/8" brass coupling

A – 1/2″ MIP x 3/8″ MIP
B – 1/2″ ball valve
C – 1/2″ x close nipple
D – 1/2″ MIP x 1/2″ barbed fitting
E – 1/2″ galvanized Tee
F – 1/2″ galvanized 45*
G – 1/2″ MIP x 3/8″ MIP
H – 3/8″ brass coupling

Boven nieuwe doorvoer Onder oude doorvoer

Boven nieuwe doorvoer
Onder oude doorvoer

Welding, cleaning, sandblasting, painting

By Geen onderdeel van een categorie, Rebuild Defender 90 @nl


DSCN4079

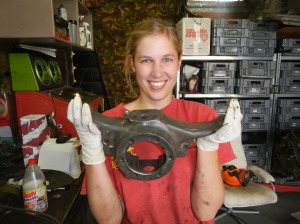
Me with one of the parts before sandblasting

DSCN4052

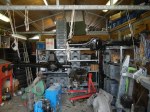
The axles hanging in the garage.

The past week we have been busy with welding, taking the axles apart, cleaning, some sandblasting and painting.

First started on the axles. It needed some new mounts and brackets, so old ones off and welded the new ones on. Then painted it black to prevent rust from forming. Once we have the diffs refurbished, the final layers of painting will be put on.

DSCN4043

Welding the bulkhead

Next up was the bulkhead. It needed new footwells and after the sand blasting it showed some more bad spots. Cutting out the footwells was quite easy, welding the new parts back in not so. The parts we got from Paddock weren’t fitting properly, to less or to much material, wrong shapes. So it needed a lot of adjusting. Now waiting for another new part, the bulkhead top corner piece. It looked like it just needed a small new plate, but the welding “ate” away more and more material so we decided to replace the whole part. We also need to chance the top part of the bulkhead where the window sits on.

DSCN4074

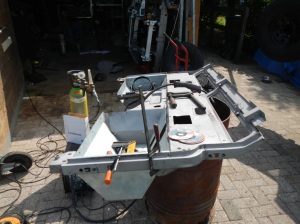
All the parts taken apart.

DSCN4077

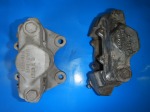
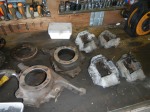
Brake calipers, after and before sandblasting.

Since the bulkhead project was on hold, we continued with the axle hubs and brake calipers. Cleaned them and now we are sand blasting them.

We also took part of the engine apart. Most of the parts looked fine, however we found a small part in the oil. In the coming days we will start to investigate what it is. Hopefully it isn’t anything major as we didn’t planned to do a complete overhaul.

DSCN4085

Our dog Sky watching over the engine

Don’t forget to view the link to the photos, there are more off the project there.